Thursday 26 November 2015

Cupcake Liner Christmas Tree Cards {Virtual Fridge}

This Week

We had so much fun with this one and it's super easy too! The idea for this super easy craft came from the blog: One Perfect Day where you will find a beautiful step by step tutorial on making Cupcake Liner Christmas Tree Ornaments. Instead of hanging ours on the tree we glued them to some card stock and turned them into Christmas Cards.

This Month's Theme
Welcome to the Virtual Fridge for the month of May. If you are after some inspiration our theme is THANKSGIVING.

This weeks Feature

This weeks feature is a tutorial from over at One Little Project at a Time.  Debbie shares this super craft to do with your children in an easy step by step tutorial you can find at: Pom Poms and Pinecones Christmas Ornaments

Introducing ...
Sadly two of our hosts have entered a new season of life and have stepped down from hosting the weekly Virtual Fridge.  Recently two new bloggers have joined our ranks and will be joining in to host the Virtual Fridge from December.

Today I would like to introduce Rebecca from over at Raventhreads.   Last week they did some Minion Model Magic.


Your Turn

I invite you to take some photo's of your children's artistic pursuits put them in a post and link up with me I would love to come over and see the wonderful art your children have enjoyed doing.
Virtual Fridge Link Up

Blessings
Chareen

Connect with me
 Facebook Google+ Pinterest Instagram YouTube RSS Feed

The Virtual Fridge a weekly art meme where we can hang our children's art on a virtual fridge. This meme was started by Jennifer over at A Glimpse of our Life who kindly invited three other bloggers to co-host this weekly meme.

Your hosts are


Wednesday 25 November 2015

Can you fit it ALL in during the High School Years? {Homeschool Highschool}


Another month has disappeared and there are many new things on the horizon.  It feels the same way when you are homeschooling your children and suddenly you wake up one morning and realize that you are now in the High School years in your Home School.

All of a sudden many mothers start asking themselves: How am I going to fit it all in ? Oh dear how am I going to homeschool high school alongside homeschooling the others? Fostering Independence...?  What sort of schedule do I need ? Let's tackle each of these questions...

1. How am I going to fit it all in ?

I think that the question that needs to be asked is:  "What exactly is it all?" and once you have the answer to that you need to ask yourself: "Why do you need to do what's on the list?"

A while back when I wrote a guest post titled: Be True to Yourself I realised that one of the things I tended to do as a home school Mom was to add to my home school all the wonderful new things that everyone else seems to be doing.  Each day of our home school day became so heavy as I was trying to live our home school life in the same manor that everyone else was ...  We were trying to make our day a carbon copy of 20 other families home school days and it was physically impossible.

In reality you need to find the perfect fit for who you and your children are and run with that.  Stop trying to add everyone elses 'perfect day' to your day.  You need to stay TRUE to YOURSELF and homeschool according to whom you and your children are.

2. How am I going to home school high school alongside homeschooling the others? 

The answer to this question is as varied as families are different from one another.  What works for one family may not work for yours.  When Nathaniel was a toddler and I had two high school students I found the secret for our success was flexibility.  What ever worked this week I knew may not work next week.  The reason for this is simple: every week your children grow and every week their needs are slightly different.
I found the best was to keep a flexible schedule that followed a similar rhythm and tweak it as the need arose.  If one of my high schoolers needed extra coaching the other took time to play with Nathaniel and keep him busy.  If he was having a grouchy day I waited till nap time before we did any read alouds. 

3. Fostering Independence...? 

 This is a question that is actually a delicate one.  Allowing too much independence too soon is just as dangerous as not allowing enough independence later on.  It is a tightrope act that each family needs walk independently (pardon the pun...)
Looking back over our choices I have one caution:  It is something to consider seriously when allowing your students opportunities to tackle tertiary studies at a young age.  My first two attended colleges/universtiy at young ages and each one faced challenges that stretched them each in both good and bad ways. Before sending young students to attend tertiary classes be sure to 'count the cost'.  I am not speaking about financial cost. The cost I'm referring to is the cost of their youth.  Once they are cast into the adult world there is no turning back the clock. There is the huge cost of TIME once they are there.  The time it takes to commute. The time that it takes to do home work. The time it will cost to your family is a lot bigger than you know. Be sure to weigh up the advantages and disadvantages to allowing a young student to attend tertiary studies at too young an age.

Remember that just because your students are in their teens it does not mean they now need to be shut up in a room by themselves! After all you home educate so that you can be together as a family.  So keep learning together. Independence is NOT isolation.

At the same time be sensitive to your child's learning styles.  Some times they may need to work by themselves and sometimes they may need to be together with the family to be supported in more difficult learning.  The key here is to be flexible in your approach and do what works for your student.  Create a space to encourage success whether it be the dinning table alongside the whole family or a desk in a quiet space.  For that matter you could have both! 

4. What sort of schedule do I need ?

Looking back at our high school years one of my biggest regrets was changing up things too much.  I feel that when we did this we lost a lot of our joy and our energy.   My motto now is: Why fix what's not broken?  If you have a schedule that is working keep it.  Tweek it slightly to accommodate new studies but keep the foundations the same and enjoy the journey.


I would love to read your thoughts on Fitting it all in, in high school please leave a link to your post in the comments.

Blessings
Chareen


A Note from my daughter Jane
Visiting London.
Homeschooling when you hit high school is NOT as daunting or scary as it may seem. In fact, I'll let you in on a little secret. It's just the SAME as it was yesterday. You're just changing some of your learning material and there might be a little more work load than there was before. But to be honest, it's all a lot more fun!

You're going to have days where it might feel like the work load is bigger than you, but you will also have days where it feels like a breeze. I've never used a calendar in my life and I also never struggled to fit schooling time in if I sat down and actually did it. Although, if you're more organized than me, a workload diary could be a good option to keep in mind! I always found ample time for extra-curricular activities and ALWAYS time to read a good book with some tea! Which, let's be honest. Should be a PRIORITY in your day.

~ Homeschooling High school mixed with Junior Homeschooling~
 Having younger siblings isn't something to worry about at all! I found often it was good to set a routine for the younger child(ren) each day with their play time and during that time I would address my subjects that needed extra attention.

Don't forget, you're allowed to have days off and go on an adventure... even in high school home school

Jane
Jane is currently on a world wide travel adventure and you can follow along on Instagram.  She was home educated from Kindy {preschool} to High School.  Graduated at 16 with a Cert III in Children's Services and a Cert III in Retail, an RSA certification, First Aid certification and Anaphylaxis certification.  Last year she completed a Cert IV in Human Resources in preparation to enter the secretarial work force.  She has been working full time since 2012.

Read more on How to Fit it ALL in while educating in the high school years:

    Home School High School Topics

    Over the next few months we will be sharing some insights into the following aspects of home educating through the high school years
    • Planning for High School {How and When,ways to/how we're planning to earn college credit while still in high school, Meeting High School Requirements, how to assign credit when there aren't tests, What records do you keep? How do you present them? What influences your method, your emphasis in certain areas?}
    • Electives in the High School Years {Following Passions, following interests, fitting a job in with school, and Being intentional in Preparing for what comes after high school, Life skills.}
    • Math, Science, Biology, History {What do you use ? Why do you use ... ? What influences your choices/selection? }
    • 30 September - Language Arts {Poetry, Literature, Composition, writing, What influenced your choices/selection?}
    • "How am I going to teach High School ...?" {Addressing the fear factor of teaching subjects we struggle with or know nothing about, How to achieve credit in subjects your student *hates*}
    • How do you fit it all in ? {homeschooling high school alongside homeschooling the others, Fostering Independence, Do you generalize or specialize? Schedules,}
    • 30 December - Graduation { Fostering Independence, How do you know when they are done ?}
    Until next month.  Happy blog hopping
    Blessings
    Chareen

    Saturday 14 November 2015

    Low Carb Baking Mix Collection {FREE DOWNLOAD}

    As summer approaches for us and I am surrounded by new life I have been encouraged once again to resume my Trim Healthy Mama journey.

    I recently purchased the NEW Trim Healthy Mama Cookbook and have been searching for a low carb baking mix to use in more of my cooking.

    I have found some really great recipes on pinterest, Facebook and the internet and needed one place to keep them all.

    You can download your FREE pdf HERE


    None of the Baking Mix recipe’s contained in this round up are my own invention. Each one has been lovingly put together by the passionate cooks around the web.

    I have linked each baking mix recipe to the original source on line. Follow the links for the complete recipes and recipe cards. IF an author does not have a printable for their recipe I have typed it out and included it here.

    PLEASE be sure to visit these lovely blogs and encourage the cooks who have freely blessed us with these recipes.

    Do you have a favourite Low Carb baking mix? Please leave a link in the comments and I will update and add them to the post and to this download.

    Blessings
    Chareen

    PS There are a couple of recipe’s here that I could not find the original source text for. If you know where they are from please let me know in the comments so that I may give the author credit for his/her work.

    Pin this post HERE


    FREE Low Carb Baking Mix Recipe Collection Briana Thomas Baking Mix Sheri's Gluten Free Baking Mix Rayes Easy Baking Mix Moma's Low Carb Baking Mix

    Baking Mix Recipes on the web

    **A couple of things to note ...

    1. Oat Fibre is NOT Oat flour or Oat Bran and those two cannot ever substitute for it. Oat Fibre is bran with all the starch stripped from it and is fat and carb free. Currently very difficult to find locally; only online or through the Aussie Mamas store. The only product you can sub for it is Psyllium (found at any health food or major supermarket).
    2. Integral Collagen/Collagen Peptides are the NON-setting Gelatine. Currently this product is not made in Australia and the only options are the Great Lakes GREEN tin, the THM brand. It has mega health benefits especially for those with arthritis/joint issues.  
    3. Protein Powder is Whey Isolate. Only ISOLATE. Whey Concentrate and blends are not on plan.
    4. Flax meal is also called Linseed in Australia.
    5. Gluccomannan is another difficult product to buy locally. Again, Aussie Mamas have it available, or order online from iHerb or similar, or sub with xanthan gum (will not get the same health benefits) or leave it out.
    6. Almond meal and flour are interchangeable. Almond flour is made with the plain almond nut, the meal is coarser and made with the whole almond (including the skin). Doesn't make any difference to the end product.
    **Some items are not available in Australia or other countries.

    Low Carb Baking Blends

    *Baking Mix (FP) by L.Slote

    1 c oat fibre
    3 tablespoons coconut flour
    2 Tablespoons almond flour
    3 table spoons golden flax meal
    ½ teaspoon glucomannan

     Nutrition for ¼ cup serving: 2.9 grams fat, 1.3 grams carbs
    *Found on Facebook

    Homemade Baking Mix

    2 cups Oat fiber 1 cup
    3 TBSP coconut flour
    1 cup Collagen Peptides
    ¾ cup + 2 tsp golden flax seed meal ( if you have whole, grind half that amount of whole and you get the right amount of meal)
    6 TBSP + 1 tsp Blanched Almond flour
    3 TBSP + ½ tsp Glucomannan powder

    **Found on Pinterest

    Baking Mix (S)

    1 ½ cups Oat Fiber
    1 ½ cups Coconut Flour
    ¾ cup Whey Protein Isolate
    ½ cup Flax Meal
    2 Tablespoons glucomannan

    Replace cup for cup with flour.
    **Found on Pinterest

    *Alternative Baking Mix

    1 ½ cups oat fiber
    1 ½ cups coconut flour
    ¾ cup Almond Flour
    ¾ cup Whey Protein Isolate
    ½ cup ground Golden Flax
    2 Tablespoons Glucomannan
    2 Tablespoons Collagen Peptides

    Nutrition for ¼ cup serving: 4.1 grams fat, 2.3 grams carbs
    *Found on Facebook

    *Jen’s FP Baking Mix 


    1 ½ cup Oat Fibre
    1 ½ cup coconut Flour
    ¾ Cup Almond Flour
    ¾ cup Whey Protein Isolate Powder
    ½ cup Golden Flax Meal
    2 Tablespoons Glucomannan

    Nutrition for ¼ cup serving: 3 grams fat, 2 grams carbs
    *Found on Facebook

    *Zoe’s Baking Mix 

    2 ⅓ Cups Oat Fibre
    200 ml Coconut Glour
    ⅓ cup Oat Flour
    ½ cup Ground Golden Flax
    ½ Cup Almond Flour
    ½ Cup Whey Protein Isolate
    2 Tablespoons Collagen Peptides
    2 Tablespoons Glucomannan

    Nutrition for ¼ cup serving: 3.3 grams fat, 1.6 grams carbs
    *Found on Facebook

    Pin this post HERE

    Friday 13 November 2015

    GrapeVine Studies - Birth of Jesus: Multi-Level - {Review}

    Over the last few years I have seen the name GrapeVine Studies on a few homeschool blogs and have really wanted to use their products with Nathaniel.  I was very excited to learn that they have a Birth of Jesus: Multi-Level and even more excited when they offered it to the crew to use.

    One of the things that attracted me to the study is that your student does not need to be writing at any grade level in order to use it.  Not being able to write does not affect their ability to fully use the curriculum.

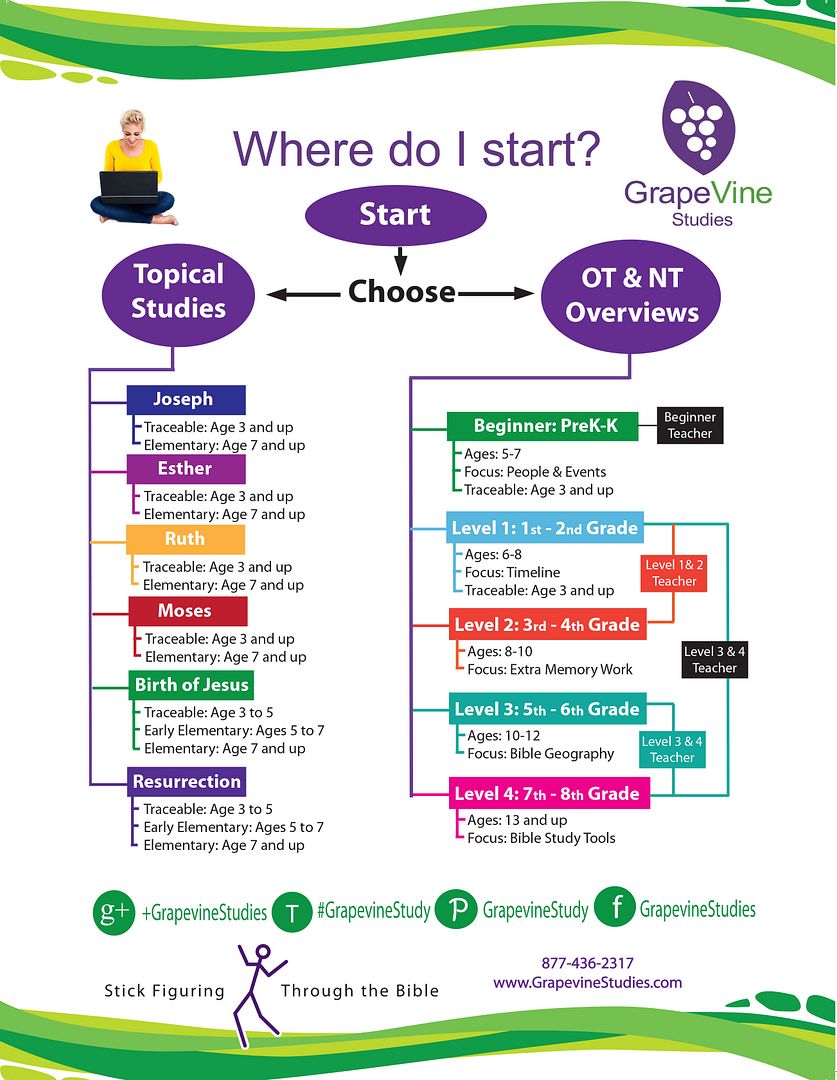
    Currently they have an Old Testament and New Testament overview, Esther,  Biblical Feasts and Holidays, Old Testament Catechism, Birth of Jesus and The Resurrection studies available. You can download a sample of each study HERE.

    What we received
    • Birth of Jesus study Student eBook (1.1 MB) - 49 pages consisting of:
      • Birth of Jesus Timeline,
      • The Announcement,
      • Birth of Jesus,
      • The Proclamation,
      • The Wise Men and Herod,
      • Final Review,
      • Map
    • Birth of Jesus Study Traceable eBook (4.9 MB) - 49 pages consisting of the same as the Student eBook.
    • Birth of Jesus Study Teachers Manual (5.24 MB) - 65 pages. This book is divided into:
      • About GrapeVine
      • Teacher Goals
      • Student Goals
      • Supply List
      • Teaching mulit-levels
      • Timeline Narrative
      • Lesson Goals/Key Points
      • The Announcement
      • Birth of Jesus
      • Proclamation
      • Wise Men & Herod
      • Final Review
      • Map

    How we used the Study

    After downloading the three pdf documents I printed both the teachers and student manual for our use.  I only have a black ink printer so our cover is in grey-scale.  The actual product has a beautiful red and green cover. In the multi-level pack you have two options to use for your students.  The one is the basic student pages and the other is in traceable format which is suitable for younger students or students in need of support in their drawing. The only supplies needed for the student are: a bible, the student pages and coloured pencils.   The student needs the following eight colours to use: Purple, Blue, Green, Yellow, Orange, Red, Brown and Black.


    There is not a lot of prep work involved in using the program. The Teachers Manual is well laid out and all the prep work and lessons are laid out in detail.  The basic frame work is laid out for you and it is up to you on how you present the lessons and to what depth you want to pursue each topic according to your own denominational doctrinal belief.


    As a teacher you will need The Teachers manual, 8 coloured markers and a bible dictionary.   Since it's only Nathaniel and I, I chose to use sharpie pens and plain white paper as my delivery medium for the lessons. The manual has two different suggested schedules one is daily lessons and the other is weekly.  We did a weekly lesson.
     The program starts with a timeline of events to help the students understand the sequence of events. There is no guess work on how to draw the pictures or what to say to the students it's all laid out for you in the teachers manual. I appreciated having the stick figure guidelines.  This made for a much simplified lesson.  When I first told Nathaniel we would be drawing pictures he complained because he does not like to colour in.  When he saw that we were drawing stick figures he became very enthusiastic of the program.
    Teachers Manual sample page.
    Working on the stick-figure timeline.


    The next stage consisted of looking up the bible verse and then drawing what we had read.  Nathaniel really enjoyed adding up the total number of generations between Adam and Jesus.

    Drawing stick-figures for our lesson.
     After completing the last Student Page it was time to do a drawing review.  This consists of the student drawing their favourite part of the story and writing their memory verse.

    This is followed with a final review of the study.  The final review consists of 28 questions covering the events from the announcing the generations between Adam and Jesus up to and including when Mary, Joseph and Jesus return and the Word says He grew.


    Each sections we studied also had questions covering the lesson. Some lessons had a set of words to look up in a bible dictionary.  There is also a map to label at the end of the book.

    *Cost of GrapeVine Birth of Jesus
    • Student Book $8-00
    • Teacher Book $12-50
    • Traceable Book $8-00
    • Student Family eBook $6-50
    •  Teacher eBook $10-00
    • Traceable Family eBook $8-00
    *All prices are current at time of review.  Please check the website for up to date pricing before purchasing. All prices shown are in U.S. dollars.
    Recommended Age Range
    • Ages 7+

    Connect with GrapeVine on Social Media


    Facebook Google+ Pinterest Twitter

    Over All I thought ...
    Nathaniel and I both enjoyed this lesson and look forward to using other GrapeVine products in the future.  He loved the simplicity and that there were no complex drawings and I enjoyed using the Word and coaching him on note taking using stick figures.

    The Schoolhouse Review Crew have also reviewed Creation to Jacob.

    Blessings
    Chareen


    Click to read Crew Reviews

    Thursday 12 November 2015

    Giraffe Faces {Virtual Fridge}

    This Week
    Wow time flies so fast and we've missed a few weeks of the Virtual Fridge but I'm pleased to say we are back.  This week we learned to use a new medium: acrylic paint.  Painting small area's was a little challenge for Nathaniel as we have not done very much painting up until now.


    This Month's Theme
    Welcome to the Virtual Fridge for the month of November. If you are after some inspiration our theme is THANKSGIVING.

    This weeks Feature

    This weeks feature is a tutorial by Susie from over at Busy Toddler: Fall Leaf Craft.

    Your Turn

    I invite you to take some photo's of your children's artistic pursuits put them in a post and link up with me I would love to come over and see the wonderful art your children have enjoyed doing.
    Virtual Fridge Link Up

    Blessings
    Chareen

    Connect with me
     Facebook Google+ Pinterest Instagram YouTube RSS Feed

    The Virtual Fridge a weekly art meme where we can hang our children's art on a virtual fridge. This meme was started by Jennifer over at A Glimpse of our Life who kindly invited three other bloggers to co-host this weekly meme.

    Your hosts are


    Monday 9 November 2015

    Eat Your Science Homework {Ann McCallum Books Review}

    Something good to eat is always a good way to help children solidify their learning.

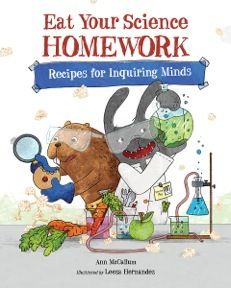
    Recently the Schoolhouse Review Crew were introduced to Ann McCallum Books.  Ann is the author of a nifty set of books in the Eat your ... series and Nathaniel and I have been working our way through Eat Your Science Homework.

    There are currently three books in the Eat Your Homework series
    1. Eat Your US History Homework  
    2. Eat Your Science Homework
    3. Eat Your Math Homework.
     Ann also has a blog where she shares recipes and encouragement on how to Eat your way through a variety of topics.

    What we received
    • ISBN: 978-1-57091-299-3
    • Published by: Charlesbridge
    • Format: Paperback
    • Copyright Date: 2009, 2014
    • Specifications: Teacher: 48 pages
    • By: Ann McCallum
    • Illustrated by: Leeza Hernandez
    • Awarded: Junior Library Guild Selection 
    The book is divided up into:
    • Introduction - Here you will discover all about delicious chemistry in the kitchen.
    • Safety instructions - We learned about safety in our lab. The tricks of the trade list was helpful for Nathaniel. It was good to read these.  I realized that some things I had not actively told him before and had assumed he knew.
    • Six experiments - Each experiment covers a particular topic. We love the creative names for each one: Atomic Popcorn Balls,  Density Dressing and Veggie Sticks, Invisable Ink Snack Pockets, Loop, Whorl and Arch Cookies, Sedimentary Pizza Lasagna and Black Hole Swallow-Ups
      • The topic is introduced and explained carefully.  The jargon is introduced in context and fully explained.
      • Next the recipe is presented.  There is a before you begin section which covers time, oven temperature and difficulty. An ingredients list followed by the step by step method.  The author coaches the student carefully in what to do in each step. 
      • The next page is a conclusion to the topic page.  We enjoyed reading these as they give some relevant information, interesting historical note in relation to the topic and concluding words.
    • Review - This is a summary of what you have learned as you've worked your way through the book.
    • Glossary - A concise list of scientific terms used throughout the book with clear explanations of each word.
    • Index -
    How we used it


    After reading the introduction page on Density, Dressing and Veggie Sticks chapter it was time to gather our supplies.


    This lesson involved no heat so I left Nathaniel up to following the directions in the method.  He enjoyed watching what happened as he added each ingredient to the bottle and surmising what he thought might happen when he added the ingredients.


     We learned some new technical jargon: immiscible, miscible and density. We also did some follow up experiments to solidify the topic of density.  The results were edible and Daddy now has some new blue salad dressing to enjoy!


    You can download a fabulous Teachers Guide for Eat Your Science HOMEWORK.


    Recommended Age Range
    • 7-10 years old

    Over All I thought ...
    We've enjoyed working our way through this beautiful book. Every single double page spread is beautifully illustrated and contains thoughtful information.  I appreciated how the author spoke directly to the child and did not assume that the student knew something.  Every concept was clearly explained and scientific terms were presented clearly and concisely.  Each experiment was followed up with a Science Sampler which ranged from finding elements present in our home to interesting information on famous scientists over the ages.

    This is a fun book to add to your science routine at home and the best part is you can EAT your experiments!

    Blessings
    Chareen


    Click to read Crew Reviews