Friday 13 November 2015

GrapeVine Studies - Birth of Jesus: Multi-Level - {Review}

Over the last few years I have seen the name GrapeVine Studies on a few homeschool blogs and have really wanted to use their products with Nathaniel.  I was very excited to learn that they have a Birth of Jesus: Multi-Level and even more excited when they offered it to the crew to use.

One of the things that attracted me to the study is that your student does not need to be writing at any grade level in order to use it.  Not being able to write does not affect their ability to fully use the curriculum.

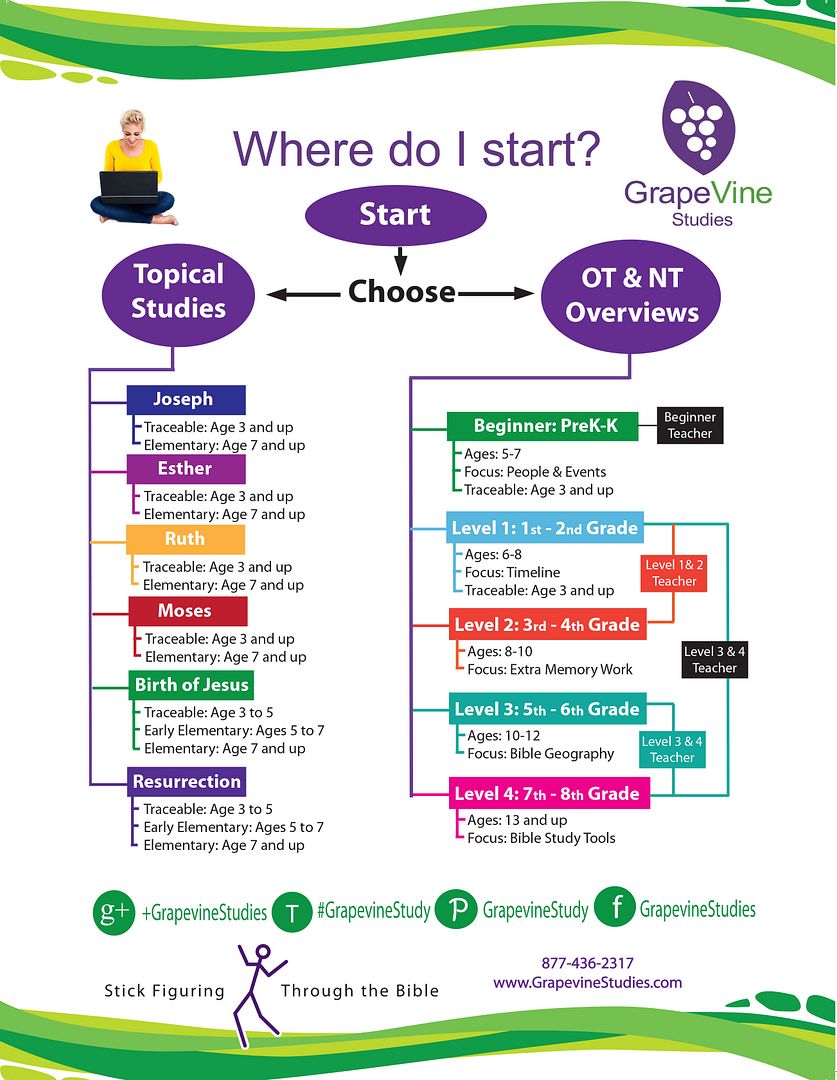
Currently they have an Old Testament and New Testament overview, Esther,  Biblical Feasts and Holidays, Old Testament Catechism, Birth of Jesus and The Resurrection studies available. You can download a sample of each study HERE.

What we received
  • Birth of Jesus study Student eBook (1.1 MB) - 49 pages consisting of:
    • Birth of Jesus Timeline,
    • The Announcement,
    • Birth of Jesus,
    • The Proclamation,
    • The Wise Men and Herod,
    • Final Review,
    • Map
  • Birth of Jesus Study Traceable eBook (4.9 MB) - 49 pages consisting of the same as the Student eBook.
  • Birth of Jesus Study Teachers Manual (5.24 MB) - 65 pages. This book is divided into:
    • About GrapeVine
    • Teacher Goals
    • Student Goals
    • Supply List
    • Teaching mulit-levels
    • Timeline Narrative
    • Lesson Goals/Key Points
    • The Announcement
    • Birth of Jesus
    • Proclamation
    • Wise Men & Herod
    • Final Review
    • Map

How we used the Study

After downloading the three pdf documents I printed both the teachers and student manual for our use.  I only have a black ink printer so our cover is in grey-scale.  The actual product has a beautiful red and green cover. In the multi-level pack you have two options to use for your students.  The one is the basic student pages and the other is in traceable format which is suitable for younger students or students in need of support in their drawing. The only supplies needed for the student are: a bible, the student pages and coloured pencils.   The student needs the following eight colours to use: Purple, Blue, Green, Yellow, Orange, Red, Brown and Black.


There is not a lot of prep work involved in using the program. The Teachers Manual is well laid out and all the prep work and lessons are laid out in detail.  The basic frame work is laid out for you and it is up to you on how you present the lessons and to what depth you want to pursue each topic according to your own denominational doctrinal belief.


As a teacher you will need The Teachers manual, 8 coloured markers and a bible dictionary.   Since it's only Nathaniel and I, I chose to use sharpie pens and plain white paper as my delivery medium for the lessons. The manual has two different suggested schedules one is daily lessons and the other is weekly.  We did a weekly lesson.
 The program starts with a timeline of events to help the students understand the sequence of events. There is no guess work on how to draw the pictures or what to say to the students it's all laid out for you in the teachers manual. I appreciated having the stick figure guidelines.  This made for a much simplified lesson.  When I first told Nathaniel we would be drawing pictures he complained because he does not like to colour in.  When he saw that we were drawing stick figures he became very enthusiastic of the program.
Teachers Manual sample page.
Working on the stick-figure timeline.


The next stage consisted of looking up the bible verse and then drawing what we had read.  Nathaniel really enjoyed adding up the total number of generations between Adam and Jesus.

Drawing stick-figures for our lesson.
 After completing the last Student Page it was time to do a drawing review.  This consists of the student drawing their favourite part of the story and writing their memory verse.

This is followed with a final review of the study.  The final review consists of 28 questions covering the events from the announcing the generations between Adam and Jesus up to and including when Mary, Joseph and Jesus return and the Word says He grew.


Each sections we studied also had questions covering the lesson. Some lessons had a set of words to look up in a bible dictionary.  There is also a map to label at the end of the book.

*Cost of GrapeVine Birth of Jesus
  • Student Book $8-00
  • Teacher Book $12-50
  • Traceable Book $8-00
  • Student Family eBook $6-50
  •  Teacher eBook $10-00
  • Traceable Family eBook $8-00
*All prices are current at time of review.  Please check the website for up to date pricing before purchasing. All prices shown are in U.S. dollars.
Recommended Age Range
  • Ages 7+

Connect with GrapeVine on Social Media


Facebook Google+ Pinterest Twitter

Over All I thought ...
Nathaniel and I both enjoyed this lesson and look forward to using other GrapeVine products in the future.  He loved the simplicity and that there were no complex drawings and I enjoyed using the Word and coaching him on note taking using stick figures.

The Schoolhouse Review Crew have also reviewed Creation to Jacob.

Blessings
Chareen


Click to read Crew Reviews

Thursday 12 November 2015

Giraffe Faces {Virtual Fridge}

This Week
Wow time flies so fast and we've missed a few weeks of the Virtual Fridge but I'm pleased to say we are back.  This week we learned to use a new medium: acrylic paint.  Painting small area's was a little challenge for Nathaniel as we have not done very much painting up until now.


This Month's Theme
Welcome to the Virtual Fridge for the month of November. If you are after some inspiration our theme is THANKSGIVING.

This weeks Feature

This weeks feature is a tutorial by Susie from over at Busy Toddler: Fall Leaf Craft.

Your Turn

I invite you to take some photo's of your children's artistic pursuits put them in a post and link up with me I would love to come over and see the wonderful art your children have enjoyed doing.
Virtual Fridge Link Up

Blessings
Chareen

Connect with me
 Facebook Google+ Pinterest Instagram YouTube RSS Feed

The Virtual Fridge a weekly art meme where we can hang our children's art on a virtual fridge. This meme was started by Jennifer over at A Glimpse of our Life who kindly invited three other bloggers to co-host this weekly meme.

Your hosts are


Monday 9 November 2015

Eat Your Science Homework {Ann McCallum Books Review}

Something good to eat is always a good way to help children solidify their learning.

Recently the Schoolhouse Review Crew were introduced to Ann McCallum Books.  Ann is the author of a nifty set of books in the Eat your ... series and Nathaniel and I have been working our way through Eat Your Science Homework.

There are currently three books in the Eat Your Homework series
  1. Eat Your US History Homework  
  2. Eat Your Science Homework
  3. Eat Your Math Homework.
 Ann also has a blog where she shares recipes and encouragement on how to Eat your way through a variety of topics.

What we received
  • ISBN: 978-1-57091-299-3
  • Published by: Charlesbridge
  • Format: Paperback
  • Copyright Date: 2009, 2014
  • Specifications: Teacher: 48 pages
  • By: Ann McCallum
  • Illustrated by: Leeza Hernandez
  • Awarded: Junior Library Guild Selection 
The book is divided up into:
  • Introduction - Here you will discover all about delicious chemistry in the kitchen.
  • Safety instructions - We learned about safety in our lab. The tricks of the trade list was helpful for Nathaniel. It was good to read these.  I realized that some things I had not actively told him before and had assumed he knew.
  • Six experiments - Each experiment covers a particular topic. We love the creative names for each one: Atomic Popcorn Balls,  Density Dressing and Veggie Sticks, Invisable Ink Snack Pockets, Loop, Whorl and Arch Cookies, Sedimentary Pizza Lasagna and Black Hole Swallow-Ups
    • The topic is introduced and explained carefully.  The jargon is introduced in context and fully explained.
    • Next the recipe is presented.  There is a before you begin section which covers time, oven temperature and difficulty. An ingredients list followed by the step by step method.  The author coaches the student carefully in what to do in each step. 
    • The next page is a conclusion to the topic page.  We enjoyed reading these as they give some relevant information, interesting historical note in relation to the topic and concluding words.
  • Review - This is a summary of what you have learned as you've worked your way through the book.
  • Glossary - A concise list of scientific terms used throughout the book with clear explanations of each word.
  • Index -
How we used it


After reading the introduction page on Density, Dressing and Veggie Sticks chapter it was time to gather our supplies.


This lesson involved no heat so I left Nathaniel up to following the directions in the method.  He enjoyed watching what happened as he added each ingredient to the bottle and surmising what he thought might happen when he added the ingredients.


 We learned some new technical jargon: immiscible, miscible and density. We also did some follow up experiments to solidify the topic of density.  The results were edible and Daddy now has some new blue salad dressing to enjoy!


You can download a fabulous Teachers Guide for Eat Your Science HOMEWORK.


Recommended Age Range
  • 7-10 years old

Over All I thought ...
We've enjoyed working our way through this beautiful book. Every single double page spread is beautifully illustrated and contains thoughtful information.  I appreciated how the author spoke directly to the child and did not assume that the student knew something.  Every concept was clearly explained and scientific terms were presented clearly and concisely.  Each experiment was followed up with a Science Sampler which ranged from finding elements present in our home to interesting information on famous scientists over the ages.

This is a fun book to add to your science routine at home and the best part is you can EAT your experiments!

Blessings
Chareen


Click to read Crew Reviews